What is XML? There are many, wider, better and more in-depth descriptions of XML than this. W3C has a good page to start from if you want to know more. The official Qt XML documentation is also well worth reading. This will be a pragmatic guide to XML. There is far more to know, and far more that one needs to know. The purpose is to show how to get started with Qt and XML.
Qt offers XML support as a module, so some paying users may not have it, but the free edition and the enterprise editon does have it. Know this before you attempt using the examples.
Now you may ask: why use XML? There are many reasons but some are that it is easy to read (for humans and computers), easy to use from code and that it makes it easy to exchange information with other applications. There are probably more and better reasons, but these are some.
Qt offers two ways to interact with XML contents: DOM and SAX. SAX is the simpler of them, read and parse as we go. DOM reads the entire XML file into a tree in memory. This tree can then be read and manipulated before being either thrown aside or written back to disk.
SAX makes it hard to modify the given data. On the other hand, it requires very little memory while still being just as useable as DOM in many situations.
DOM requires more memory. The entire document is to be kept in memory. This gives in return the ability to modify and work with the document freely in memory and then put it back to the disk. This is very handy in many situations.
Before the actual code of this chapter there are some conventions that are important. An XML document consists of a number of tags, these tags can contain data and have attributes. Example 9-1 shows this. Tags cannot be nested, i.e the tag being closed must be the last tag opened.
<tag attribute="value" />
<tagWithData attribute="value" anotherAttribute="value">
data
</tagWithData>
Example 9-1
Now for the task of today. The address book application will be upgraded with an XML-based file format. Before that can be done we need to be able to read and write XML. Lets look at how it is done.
In this section the target is to take a Contact record and write it out as XML. The DOM API will be used. Here is the plan:
The first part is easy. The code is shown in example 9-2. The "AdBookML" is the name of our mark-up convention.
QDomDocument doc( "AdBookML" );
Example 9-2
Why is a root element needed? This is to have a point to start from. Our root element will be called adbook. This is created in the code of example 9-3.
QDomElement root = doc.createElement( "adbook" );
doc.appendChild( root );
Example 9-3
For the third part a function will be used: ContactToNode. It is shown in example 9-4.
QDomElement ContactToNode( QDomDocument &d, const Contact &c )
{
QDomElement cn = d.createElement( "contact" );
cn.setAttribute( "name", c.name );
cn.setAttribute( "phone", c.phone );
cn.setAttribute( "email", c.eMail );
return cn;
}
Example 9-4
That is a bit heavier than the first two parts. First an element called contactis created. Then three attributes: name, phone and email are added. For each attribute the value is set. setAttribute either replaces and existing attribute with the same name or adds a new one. Each call to this function will end up in an element that can be added to the document root.
The fourth part is handled by opening a file, creating a text stream and then calling the toString() method of the DOM document. Example 9-5 shows the full main function (including the first two parts and the two calls to the third part).
int main( int argc, char **argv )
{
QApplication a( argc, argv );
QDomDocument doc( "AdBookML" );
QDomElement root = doc.createElement( "adbook" );
doc.appendChild( root );
Contact c;
c.name = "Kal";
c.eMail = "kal@goteborg.se";
c.phone = "+46(0)31 123 4567";
root.appendChild( ContactToNode( doc, c ) );
c.name = "Ada";
c.eMail = "ada@goteborg.se";
c.phone = "+46(0)31 765 1234";
root.appendChild( ContactToNode( doc, c ) );
QFile file( "test.xml" );
if( !file.open( IO_WriteOnly ) )
return -1;
QTextStream ts( &file );
ts << doc.toString();
file.close();
return 0;
}
Example 9-5
Finally, example 9-6 shows the resulting file.
<!DOCTYPE AdBookML>
<adbook>
<contact email="kal@goteborg.se" phone="+46(0)31 123 4567" name="Kal" />
<contact email="ada@goteborg.se" phone="+46(0)31 765 1234" name="Ada" />
</adbook>
Example 9-6
In this section the plan is to read the document we just created into an application and access it as a DOM document. This task is split into the following parts:
The first part is shown as code in example 9-7. An empty document is instaciated and the file content is assigned to it (if the file is opened properly). After this, the file can be discarded as the entire document has been read into memory.
QDomDocument doc( "AdBookML" );
QFile file( "test.xml" );
if( !file.open( IO_ReadOnly ) )
return -1;
if( !doc.setContent( &file ) )
{
file.close();
return -2;
}
file.close();
Example 9-7
The next step is to find the root element, or document element as Qt refers to it as. Then it is checked to ensure that is is an "adbook" element and nothing else. The code for this is shown is example 9-8.
QDomElement root = doc.documentElement();
if( root.tagName() != "adbook" )
return -3;
Example 9-8
The third and fourth stage are combined in a loop. Each element is checked, if it is a contact, the attributes of it are analysed, otherwise it is ignored. Notice that the attribute method allows a default value, hence if the attribute is missing we get an empty string. The code for this is in example 9-9.
QDomNode n = root.firstChild();
while( !n.isNull() )
{
QDomElement e = n.toElement();
if( !e.isNull() )
{
if( e.tagName() == "contact" )
{
Contact c;
c.name = e.attribute( "name", "" );
c.phone = e.attribute( "phone", "" );
c.eMail = e.attribute( "email", "" );
QMessageBox::information( 0, "Contact", c.name + "\n" + c.phone + "\n" + c.eMail );
}
}
n = n.nextSibling();
}
Example 9-9
Notice that using XML allows us to handle backwards file format compatability easily. As additional element types and attributes are ignored it would be easy to store additional data in future versions.
This section will look much as the previous since it is also about reading. The difference is that this time, a SAX reader will be used. This means that the source, i.e. the file, must be open during the entire operation as there will be no buffering.
A SAX in Qt is easiest to implement using a QXmlSimpleReader and a custom sub-class of QXmlDefaultHandler. The default handler has methods that gets called by the reader when a document starts, or an element opens or closes. Our handler is shown in example 9-10 and has two purposes: collect customer information and to know when it is inside an adbook tag or not.
class AdBookParser : public QXmlDefaultHandler
{
public:
bool startDocument()
{
inAdBook = false;
return true;
}
bool endElement( const QString&, const QString&, const QString &name )
{
if( name == "adbook" )
inAdBook = false;
return true;
}
bool startElement( const QString&, const QString&, const QString &name, const QXmlAttributes &attrs )
{
if( inAdBook && name == "contact" )
{
QString name, phone, email;
for( int i=0; i<attrs.count(); i++ )
{
if( attrs.localName( i ) == "name" )
name = attrs.value( i );
else if( attrs.localName( i ) == "phone" )
phone = attrs.value( i );
else if( attrs.localName( i ) == "email" )
email = attrs.value( i );
}
QMessageBox::information( 0, "Contact", name + "\n" + phone + "\n" + email );
}
else if( name == "adbook" )
inAdBook = true;
return true;
}
private:
bool inAdBook;
};
Example 9-10
The startDocument method is called at first when the document starts. This is used to initialize the state of the class to not being in an adbook tag. For each tag that opens, the startElement method is called. It makes sure that if an adbook tag is found, the state is altered, and if a contact tag is found while inside an adbook tag the attributes are read. Finally, the endElement method is called whenever a closing tag is encountered. If it is an adbook tag that closes, the state is updated.
Using the AdBookParser is easy. Example 9-11 shows the code. First the file is assigned to the parser as the source, then the handler is assigned to the reader which is used to parse the source. This may look a bit too simple, and perhaps it is. In real world applications it is recommended to use a QXmlErrorHandler. This, and more details are well described in the official documentation.
int main( int argc, char **argv )
{
QApplication a( argc, argv );
AdBookParser handler;
QFile file( "test.xml" );
QXmlInputSource source( file );
QXmlSimpleReader reader;
reader.setContentHandler( &handler );
reader.parse( source );
return 0;
}
Example 9-11
The usage of a SAX parser also allows easy implemented backwards compatibility since unidentified tags and attributes are ignored. It also allows the parsing of partially illegal XML files. For example, only the opening of each contact tag is required.
The upgrade will start with changes to the Contact class. There will be a constructor for creating a Contact from a QDomElement and one for creating an empty Contact. There will also be a method to create a QDomElement from the current Contact. The header is shown in example 9-12 and the implementation is in example 9-13. The implementation is put in the new file called contact.cpp.
class Contact
{
public:
QString name,
eMail,
phone;
Contact( QString iName = "", QString iPhone = "", QString iEMail = "" );
Contact( const QDomElement &e );
QDomElement createXMLNode( QDomDocument &d );
};
Example 9-12
#include "contact.h"
Contact::Contact( QString iName, QString iPhone, QString iEMail )
{
name = iName;
phone = iPhone;
eMail = iEMail;
}
Contact::Contact( const QDomElement &e )
{
name = e.attribute( "name", "" );
phone = e.attribute( "phone", "" );
eMail = e.attribute( "email", "" );
}
QDomElement Contact::createXMLNode( QDomDocument &d )
{
QDomElement cn = d.createElement( "contact" );
cn.setAttribute( "name", name );
cn.setAttribute( "phone", phone );
cn.setAttribute( "email", eMail );
return cn;
}
Example 9-13
Notice that the createXMLNode code is taken more or less directly from the earlier DOM reading section of this chapter.
In order to handle the loading and saving of files two new methods are added to the frmMain class. They are designed to facilitate command line arguments and such and does not have anything to do with the user interface and how the uses chooses to save or load the files. The implementation is also more or less copied from the earlier sections concering DOM reading and writing. The difference is that they manipulate the collection of contacts and the list view and also supplies better user feedback when something unexpected occurs. The code for these can be found in example 9-14.
void frmMain::load( const QString &filename )
{
QFile file( filename );
if( !file.open( IO_ReadOnly ) )
{
QMessageBox::warning( this, "Loading", "Failed to load file." );
return;
}
QDomDocument doc( "AdBookML" );
if( !doc.setContent( &file ) )
{
QMessageBox::warning( this, "Loading", "Failed to load file." );
file.close();
return;
}
file.close();
QDomElement root = doc.documentElement();
if( root.tagName() != "adbook" )
{
QMessageBox::warning( this, "Loading", "Invalid file." );
return;
}
m_contacts.clear();
lvContacts->clear();
QDomNode n = root.firstChild();
while( !n.isNull() )
{
QDomElement e = n.toElement();
if( !e.isNull() )
{
if( e.tagName() == "contact" )
{
Contact c( e );
m_contacts.append( c );
lvContacts->insertItem( new QListViewItem( lvContacts, c.name , c.eMail, c.phone ) );
}
}
n = n.nextSibling();
}
}
void frmMain::save( const QString &filename )
{
QDomDocument doc( "AdBookML" );
QDomElement root = doc.createElement( "adbook" );
doc.appendChild( root );
for( QValueList<Contact>::iterator it = m_contacts.begin(); it != m_contacts.end(); ++it )
root.appendChild( (*it).createXMLNode( doc ) );
QFile file( filename );
if( !file.open( IO_WriteOnly ) )
{
QMessageBox::warning( this, "Saving", "Failed to save file." );
return;
}
QTextStream ts( &file );
ts << doc.toString();
file.close();
}
Example 9-14
The user interface must be able to ask the user for filenames, both for loading and saving. This is conviniently handled by the QFileDialog class through the static members getOpenFileName and getSaveFileName.
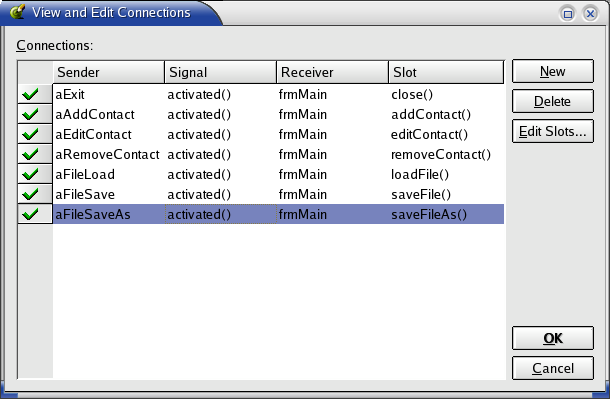
Now for the user interface. First create three new actions: aFileLoad, aFileSave and aFileSaveAs. They are put in the file menu. See table 9-1 for details.
| Widget | Property | New Value |
| aFileLoad | text | Load... |
| aFileSave | text | Save |
| aFileSaveAs | text | Save As... |
Table 9-1
These will have one slot each. They are called: loadFile, saveFile and saveFileAs. They are connected to the actions. See figure 9-1 for a view of how the connections aught to look in Designer.
Figure 9-1 The connections.
For the save option to work, the filename from the last load or save as must be stored. For this, a new private variable, QString m_filename, is added to the form as shown in figure 9-2.
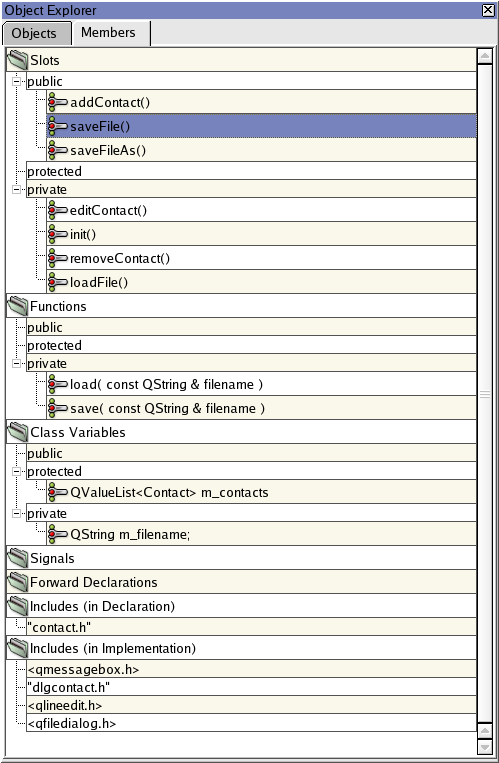
Figure 9-2 The object members or frmMain.
Example 9-14 shows the implementation of the slots. Notice how easy it is to handle the file dialogs, and also how to make save and save as cooperate nicely.
void frmMain::loadFile()
{
QString filename = QFileDialog::getOpenFileName( QString::null, "Addressbooks (*.adb)", this, "file open", "Addressbook File Open" );
if ( !filename.isEmpty() )
{
m_filename = filename;
load( filename );
}
}
void frmMain::saveFile()
{
if( m_filename.isEmpty() )
{
saveFileAs();
return;
}
save( m_filename );
}
void frmMain::saveFileAs()
{
QString filename = QFileDialog::getSaveFileName( QString::null, "Addressbooks (*.adb)", this, "file save as", "Addressbook Save As" );
if ( !filename.isEmpty() )
{
m_filename = filename;
save( m_filename );
}
}
Example 9-15
For the entire implementation, download the example source of this chapter.
For an alternate way to save and load files, look at Trolltech's second tutorial.
This is a part of digitalfanatics.org and is valid XHTML.
Copyright (c) 2002-2003 by Johan Thelin (e8johan -at- digitalfanatics.org). This material may be distributed only subject to the terms and conditions set forth in the Open Publication License, v1.0 (local copy) or later (the latest version is presently available at http://www.opencontent.org/openpub/). Distribution of substantively modified versions of this document is prohibited without the explicit permission of the copyright holder. Distribution of the work or derivative of the work in any standard (paper) book form is prohibited unless prior permission is obtained from the copyright holder.