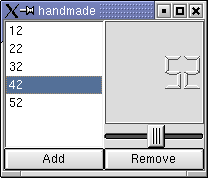
This chapter is a small sample introducing how to write signals and slots. The goal is to create a Qt application using only the command line and a text editor. The resulting application is shown in action in figure 6-1.
Figure 6-1 The resulting application.
In the last chapter layouts were used to define and control the layout of the widgets. This approach can be hand-coded too, but to add variety the QVBox and QHBox widgets will be used this time. A QVBox is a box putting its child widgets on a vertical line, while the QHBox works with a horizontal line. To implement the required layout the vertical and horizontal boxes will have to be nested. Refer to figure 6-2 for the plan. Notice that the horizontal and vertical boxes are identified by the direction of the arrow following the edge of each box.
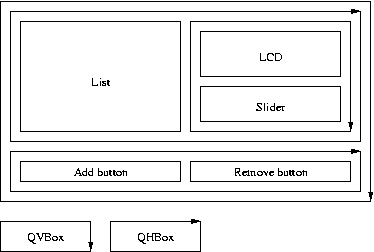
Figure 6-2 The planned layout using QVBox and QHBox.
The entire application will be implemented as a single widget. This is ok as it only is a fairly small example. If layouts would have been used a dialog would have been more appropriate. The different approaches that can be used are discussed in the next chapter, so bear with me until then.
As the outermost box (in figure 6-2) is a QVBox the widget created is derived from a QVBox. The class is named HandMade and the header file is stored as handmade.h. The code is shown in example 6-1.
Notice the surrounding #ifndef, #define, #endif. This is called to protect the header file from multiple declarations. It ensures that the class declaration only is seen once by the compiler.
The first thing we do inside the protected area is to include the definition of the class that we intend to derive our class from (QVBox). All other used classes (QListBox and QLCDNumber) are referred to as pointers, thus the only thing the compiler needs to know is that they are classes (since pointers are the same size in the memory independetly from what they point at). So, instead of including the class declarations a forward declaration is used. This reduces the number of header files that must be traversed and thus reduces the compilation time. As soon as we intend to use members of the classes (or declare them statically) the class definitions are needed, so the headers will have to be included in the implementation file of our hand made class.
After these declarations the actual class declaration follows. The first thing that a Qt class (i.e. a class derived from QObject) must include is the Q_OBJECT macro. This ensures that signals, slots and other Qt specific features work properly.
The class in it self contains one constructor and two slots. The constructor parameters are the standard Qt parameters - a parent and a name. The parent is used by the Qt memory management (and more) and the name is used when debugging. These parameters will be passed onto the base class in the implementation. The two pointers that we declare (lcd and lb) are used from the slot implementations. Those of you who remember the last chapter and that the init() slot instead of a constructor might wonder when which approach is used. The constructor generated by Designer (or actually, a tool called uic) creates the widgets of the dialog and then calls init() if it exists. This saves us from having to sub-class the dialog that we get from Designer to add our own constructor. Since we have to sub-class something to create a handmade widget, we simply skip init() and use the constructor.
#ifndef HANDMADE_H
#define HANDMADE_H
#include <qvbox.h>
class QLCDNumber;
class QListBox;
class HandMade : public QVBox
{
Q_OBJECT
public:
HandMade( QWidget *parent=0, char *name=0 );
protected slots:
void addNumber();
void removeNumber();
protected:
QLCDNumber *lcd;
QListBox *lb;
};
#endif
Example 6-1
The next step in the creation of our hand made class is to implement it. The code is shown in example 6-2 and is stored as handmade.cpp.
The file starts by including all header files that apply - including handmade.h. As the code is heavily commented I leave it as an exercise to the reader to understand it. it is worth noting that the boxes either are filled from the top down or from the left to the right. It is a good excercise to correlate figure 6-2 with the code. Remember that the outermost box is handled by the derivation of QVBox. Also, notice how easily the parent and name parameters are passed on to the base constructor from our hand made constructor.
#include <qlcdnumber.h>
#include <qlistbox.h>
#include <qpushbutton.h>
#include <qhbox.h>
#include <qslider.h>
#include "handmade.h"
HandMade::HandMade( QWidget *parent, char *name ) : QVBox( parent, name )
{
// A horizontal box for the list, slider and LCD
QHBox *hb = new QHBox( this );
// The list is placed first (i.e. to the left)
lb = new QListBox( hb );
// A vertical box to put the LCD above the slider
// This is placed to the right of the list
QVBox *vb = new QVBox( hb );
// The LCD is created first and is thus shown at the top
lcd = new QLCDNumber( vb );
// The slider is created second and is this placed below the LCD
QSlider *s = new QSlider( Horizontal, vb );
// We connect the slider valueChanged(int) signal to the LCD
connect( s, SIGNAL(valueChanged(int)), lcd, SLOT(setValue(int)) );
// A horizontal box for the buttons, below the list, slider and LCD
hb = new QHBox( this );
// The add button will be to the left
QPushButton *pb = new QPushButton( "Add", hb );
// Connect it to the addNumber() slot
connect( pb, SIGNAL(clicked()), this, SLOT(addNumber()) );
// The remove button with be to the right of the add button
pb = new QPushButton( "Remove", hb );
// Connect it to the removeNumber slot
connect( pb, SIGNAL(clicked()), this, SLOT(removeNumber()) );
}
Example 6-2
After the code in example 6-2 the implementations for the slots follows. This code is shown in example 6-3 and is also put in handmade.cpp. This code is also heavily commented and should not pose any big problems to interpret (refer to the Qt Documentation if you fail to understand any methods). Notice that we use the pointers declared in the class definition (lcd and lb) as opposed to the pb pointer that only was available within the constructor.
void HandMade::addNumber()
{
// Simply insert the number shown by the LCD
lb->insertItem( QString::number( lcd->intValue() ) );
}
void HandMade::removeNumber()
{
// Return if no item is selected
if( lb->currentItem() < 0 )
return;
// Remove the selected item
lb->removeItem( lb->currentItem() );
}
Example 6-3
Finally the last piece of code must be added. In the file main.cpp a trivial main-function is implemented that creates an instance of the hand made class and starts the Qt event loop. The code is shown in example 6-4.
#include <qapplication.h>
#include "handmade.h"
int main( int argc, char **argv )
{
QApplication a( argc, argv );
HandMade *hm = new HandMade();
a.setMainWidget( hm );
hm->show();
return a.exec();
}
Example 6-4
To create the Makefile a project description is needed. Put the code from example 6-5 in a file named handmade.pro. Then run qmake && make && ./handmade from a console to create a Makefile, use it and then run the result (the double ampersands ensures that the previous step has succeeded before running the next). This task can be done automatically by qmake by calling qmake -project, but this is supposed to be a handmade application.
SOURCES = handmade.cpp main.cpp
HEADERS = handmade.h
Example 6-5
When running the application something seems not to be working. The LCD will not change when the slider is moved! The explanation can be found in the error messages printed to the console (you do run it from a console I hope). The error message is shown in example 6-6.
QObject::connect: No such slot QLCDNumber::setValue(int)
QObject::connect: (sender name: 'unnamed')
QObject::connect: (receiver name: 'unnamed')
Example 6-6
Earlier I mentioned the Qt standard parameters, parent and name, and said that the name was used when debugging. If we had given each of the widgets names, then these names would have been in the error messages in place of "unnamed", thus making it easier for us to debug the code. In this small example we can locate the problem without the names. The missing slot setValue(int) of the LCD was called display(int) according to the Qt documentation. Just fix the connection in the constructor according to example 6-7.
// We connect the slider valueChanged(int) signal to the LCD
connect( s, SIGNAL(valueChanged(int)), lcd, SLOT(display(int)) );
Example 6-7
After a recompilation the application should work properly (just run make, no need for qmake since there are no new files). Try moving the slider around, adding some numbers to the list and removing some.
The example in this chapter shows how easy it is to produce applications using Qt, but avoiding the Designer tool. In real-life applications the layouts are usually handled in Designer, but the code still plays a big role in providing functionality.
You have seen how signal and slot problems are shown. This introduces the problem of testing all connections, but this is handled easily if all connections are made using the Designer.
Also, you have seen how easy it is to create and use project files with qmake. Compared to writing makefiles by hand, this approach is far easier.
Finally you have seen how easy it is to combine existing widgets into a composite widget.
The example code for this chapter can be found here.
This is a part of digitalfanatics.org and is valid XHTML.
Copyright (c) 2002-2004 by Johan Thelin (e8johan -at- digitalfanatics.org). This material may be distributed only subject to the terms and conditions set forth in the Open Publication License, v1.0 (local copy) or later (the latest version is presently available at http://www.opencontent.org/openpub/). Distribution of substantively modified versions of this document is prohibited without the explicit permission of the copyright holder. Distribution of the work or derivative of the work in any standard (paper) book form is prohibited unless prior permission is obtained from the copyright holder.