Qt is known to most people as a cross platform user interface toolkit, but it is much more. Qt supports, appart from graphical user interfaces, also database, files, filesystems, sockets and much more in a platform independent manner. This has both pros and cons, no need for a zillion libraries for each application, but at the price of a quite large library.
Qt is written in C++, but there are bindings for many other languages such as C, Python, C#, etc. It is fully object orientated and can be considered to be event driven.
Qt also extends C++ with signals and slots using the moc, the meta object compiler. This allows the creation of loosely coupled components that can be reused.
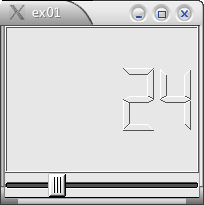
In this introductory chapter we will create a very simple application that shows how Qt looks and feels, code-wise. This chapter builds the code from scratch, but (of course) there is an integrated development environment that allows you to "draw" the user interfaces. This is covered in chapter five and onwards. Figure 1-1 shows a screenshot from the application.
A simple Qt application.
Begin by creating a new directory to hold the files of the application. I call it ex01, but that is just my naming convention for examples for this book.
A graphical user interface, GUI, consists of widgets (or controls as they are called in win32). These widgets either consist of other widgets and are called composite widgets, or are a unique widget themselves such as a button, line edit or any other element you find in an application. We will begin by declaring our own composite widget.
Create the file mywidget.h in the directory you just created, then put the code from example 1-1 in the file.
#ifndef MYWIDGET_H
#define MYWIDGET_H
#include <qvbox.h>
class MyWidget : public QVBox
{
Q_OBJECT
public:
MyWidget( QWidget *parent = 0, char *name = 0 );
};
#endif
Example 1-1
This code looks pretty normal to anyone used to C++. What we do is that we inherit the QVBox class which is just a widget that contain other widgets that are put on top of each other, i.e. are ordered vertically (hence the v). This means that any widgets that we put in this will be ordered vertically, from the top down. The constructor's parameters, parent and name, are passed down the base classes until they reach the QObject. This is used to manage the memory and simplify the debugging of the resulting application. The Q_OBJECT macro does some wonderful magic such as enabling signals and slots. More about this can be found in Trolltech's documentation and later in this tutorial.
Now for the implementation. Create a new file: mywidget.cpp and save it in the same directory as mywidget.h. Put the code from example 1-2 in it.
#include <qlcdnumber.h>
#include <qslider.h>
#include "mywidget.h"
MyWidget::MyWidget( QWidget *parent, char *name ) : QVBox( parent, name )
{
QLCDNumber *lcd = new QLCDNumber( this );
QSlider *s = new QSlider( QSlider::Horizontal, this );
connect( s, SIGNAL(valueChanged(int)), lcd, SLOT(display(int)) );
}
Example 1-2
The include lines at the top are for the two Qt classes that we use: QLCDNumber and QSlider. The interesting part is in the constructor. First, we call the QVBox constructor to pass on the parent and name down through all base classes until they eventually reach the QObject which is the base class of (nearly) all Qt's classes. In the constructor's body we instantiate an LCD number and a slider. We tell them that the parent is this, i.e. we put them in our widget which will show them from the top down, i.e. the number on top of the slider. Now for the signals and slots action. We connect the signal valueChanged(int) of the slider to the slot display(int) of the LCD number.
Most C++ programmers will react at this code, we do a new, but no delete. This is handled by the base class from which our widgets are derived. Through the QVBox (and some more classes) we inherit the QObject class that, deletes it children when deleted. So, as long as our widget is deleted the lcd number and slider will be taken care of, for free.
Finally we create a file main.cpp in our directory and put the trivial main shown in example 1-3 in it.
#include <qapplication.h>
#include "mywidget.h"
int main( int argc, char **argv )
{
QApplication a( argc, argv );
MyWidget *w = new MyWidget();
a.setMainWidget( w );
w->show();
return a.exec();
}
Example 1-3
First we create a QApplication. This can only be done once per process and provides us with a context to work in. Then we instantiate our widget, set it as the main widget of the application and show it. The last thing we do is to call exec() of the application. This method holds our event loop and triggers the event in the slider, that emits the signal which we have connected to the LCD number, thus we have a working application.
To compile it, we need to run the moc on the widget and then compile the output from the moc and link everything together. This is very easy thanks to qmake. Simply type qmake -project && qmake && make at the console and then run the application. This will do it all the things needed. If you run into any troubles compiling the code, look at chapter four and try to setup the environment properly. If that does not succeed, try chapter three and look around at the different information sources that are available on the internet.
Now, finally, I will allow myself to get a bit philosophical. I mentioned loose coupling earlier in this chapter. Notice that the slider does not know that it is an LCD number that it is changing. It actually does not know that it changes anything, it only emits the signal. In the same manner, the LCD number does not know what is calling the display method. It could be ordinary code, or a signal. They are loosly coupled. This greatly improves the modularization of the widgets and thus makes it easier to reuse them in the future.
Here you can find the example code for this chapter.
This is a part of digitalfanatics.org and is valid XHTML.
Copyright (c) 2002-2004 by Johan Thelin (e8johan -at- digitalfanatics.org). This material may be distributed only subject to the terms and conditions set forth in the Open Publication License, v1.0 (local copy) or later (the latest version is presently available at http://www.opencontent.org/openpub/). Distribution of substantively modified versions of this document is prohibited without the explicit permission of the copyright holder. Distribution of the work or derivative of the work in any standard (paper) book form is prohibited unless prior permission is obtained from the copyright holder.